
前回の記事 では Redux Toolkit と他のステート管理ライブラリを比較してみました。 今回は実際に Redux Toolkit を導入してそのコードの一部を見ながら簡単に解説をしていきます。
Redux Toolkit の導入
まずはプロジェクトに Redux Toolkit を導入します。 ここでは create-react-app を用いて 1 からプロジェクトを作成していきます。
create-react-app の redux または redux-typescript のテンプレートを用いることで簡単に Redux Toolkit のプロジェクトを作れます。
React では Props やステート等で特定の型を扱うタイミングが多いため新たにプロジェクトを始める場合は TypeScript を採用するのがおすすめです。
Node.js は執筆時点で最新の LTS である 14.16.0 を使用しています。
# Node.js のバージョンを確認
$ node --version
v14.16.0

# create-react-app を実行 ( redux-toolkit-example はアプリ名となるため適宜変更する )
$ npx create-react-app redux-toolkit-example --template redux-typescript --use-npm
create-react-app で雛形が作成できたらディレクトリに移動してアプリケーションを起動します。 下記のコマンドを実行するとブラウザが起動し http://localhost:3000 に画面が表示されます。
$ cd redux-toolkit-example
$ npm start
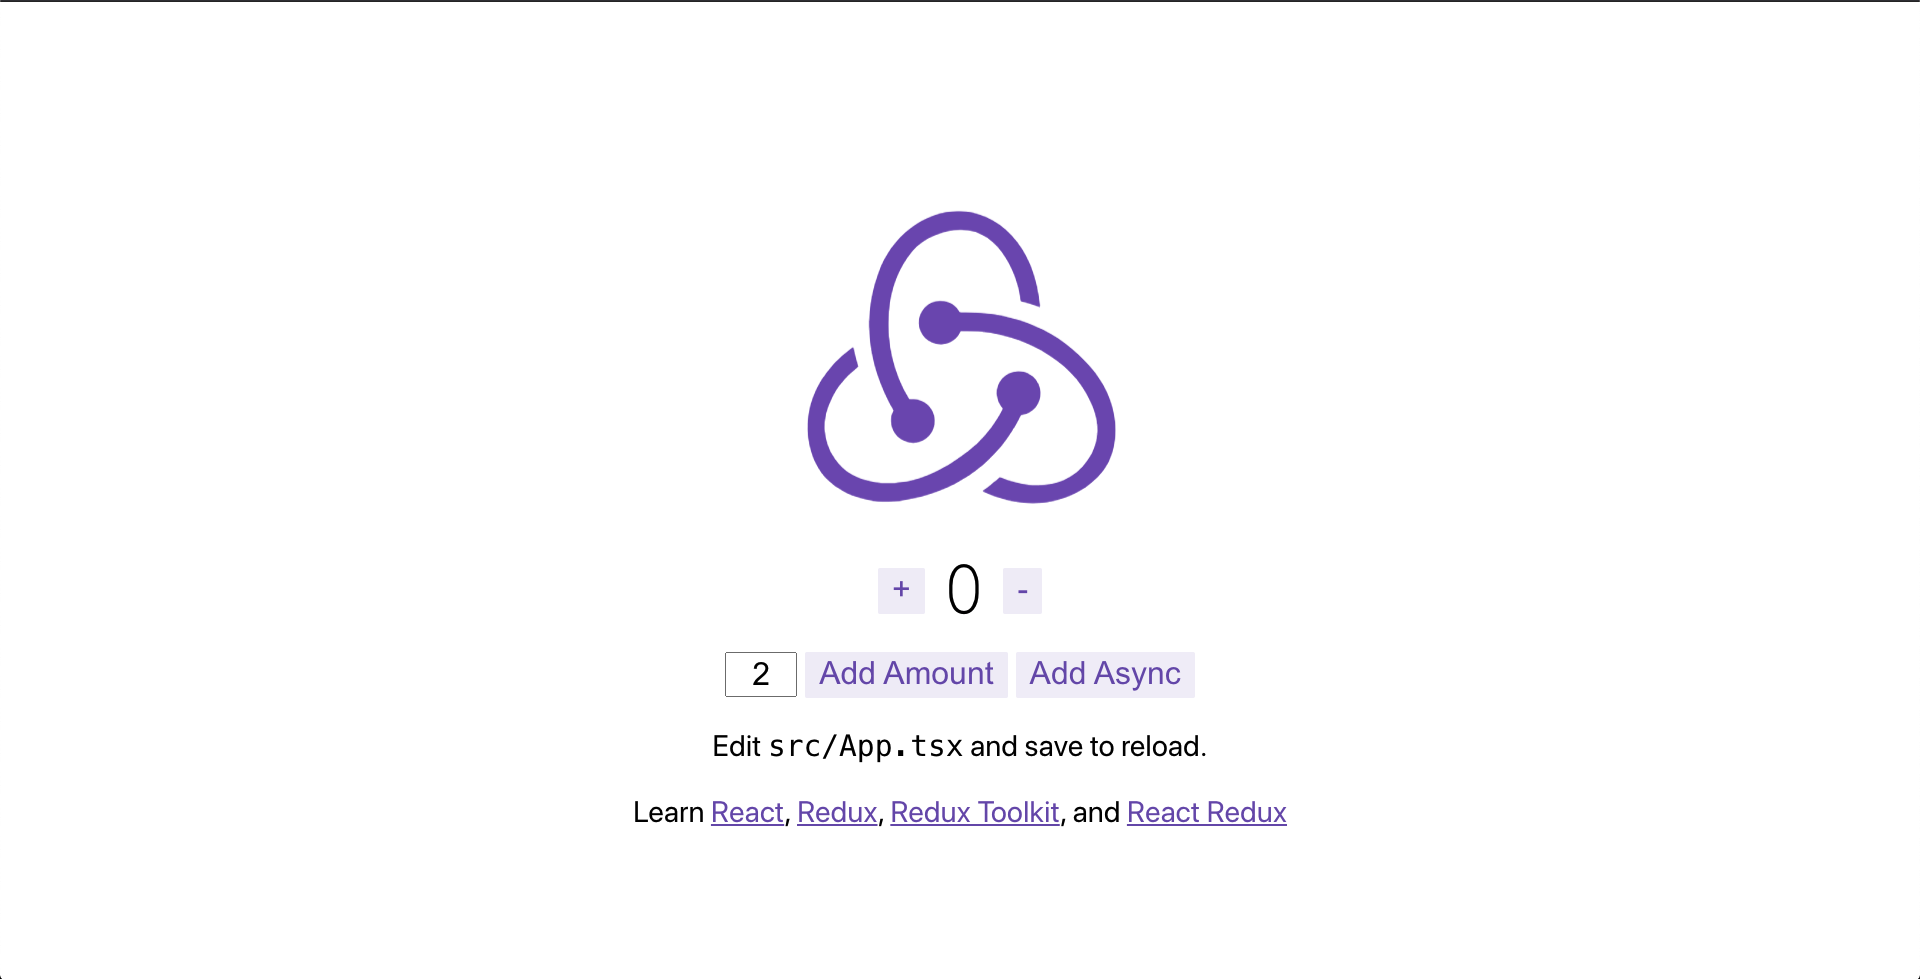
この画面では以下の操作が行えます。
- ロゴの下部にある
+と-のボタンでカウンター値の増減 - その下のテキストボックスで増減数を調整し
Add Amountボタンでテキストボックスに入力した値を加算 Add Asyncボタンで非同期の加算
Redux Toolkit の Slice 実装
動かせる状態のコードが整ったところで Redux Toolkit の実装について見て行きます。 先ほど作ったプロジェクトの以下のコードが Redux Toolkit を使う上で核となる Slice の実装部分です。
この Slice を使用することで従来の Redux で冗長だった処理が簡潔に書ける ようになっています。
このコードを分解して 1 つずつ中身を確認していきます。
// src/features/counter/counterSlice.ts
import { createSlice, PayloadAction } from "@reduxjs/toolkit";
import { AppThunk, RootState } from "../../app/store";
interface CounterState {
value: number;
}
const initialState: CounterState = {
value: 0,
};
export const counterSlice = createSlice({
name: "counter",
initialState,
reducers: {
increment: (state) => {
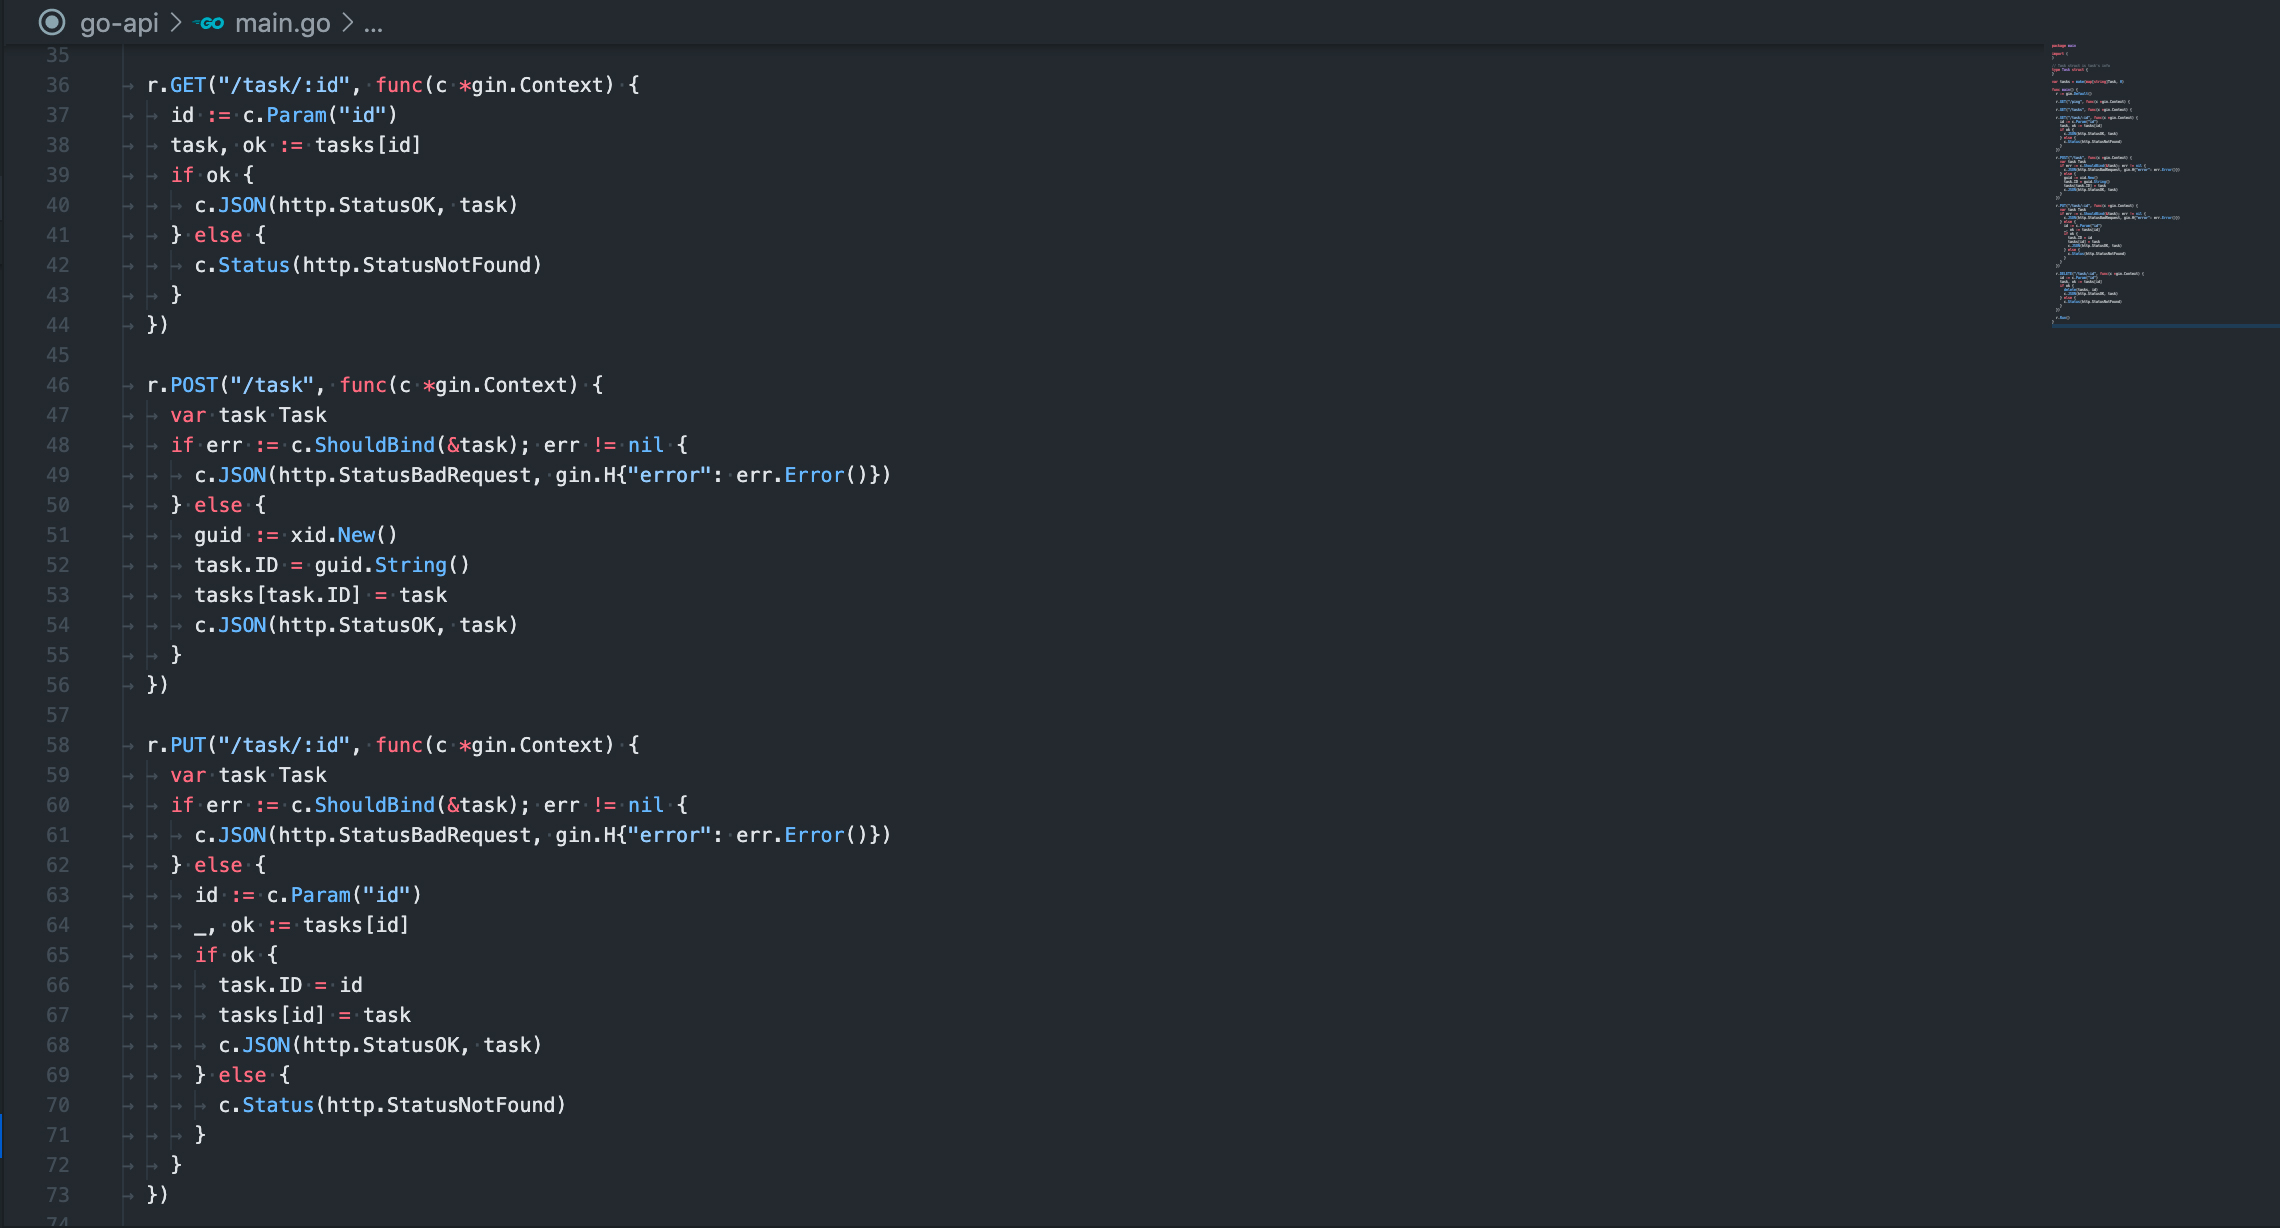
// Redux Toolkit allows us to write "mutating" logic in reducers. It
// doesn't actually mutate the state because it uses the Immer library,
// which detects changes to a "draft state" and produces a brand new
// immutable state based off those changes
state.value += 1;
},
decrement: (state) => {
state.value -= 1;
},
// Use the PayloadAction type to declare the contents of `action.payload`
incrementByAmount: (state, action: PayloadAction<number>) => {
state.value += action.payload;
},
},
});
export const { increment, decrement, incrementByAmount } = counterSlice.actions;
// The function below is called a thunk and allows us to perform async logic. It
// can be dispatched like a regular action: `dispatch(incrementAsync(10))`. This
// will call the thunk with the `dispatch` function as the first argument. Async
// code can then be executed and other actions can be dispatched
export const incrementAsync = (amount: number): AppThunk => (dispatch) => {
setTimeout(() => {
dispatch(incrementByAmount(amount));
}, 1000);
};
// The function below is called a selector and allows us to select a value from
// the state. Selectors can also be defined inline where they're used instead of
// in the slice file. For example: `useSelector((state: RootState) => state.counter.value)`
export const selectCount = (state: RootState) => state.counter.value;
export default counterSlice.reducer;
State を定義する
まずは、 CounterState と initialState についてです。 CounterState はこの Slice で扱う State の型定義で、 initialState には Slice の初期値を設定します。
interface CounterState {
  value: number;
}

const initialState: CounterState = {
  value: 0,
};
Slice を作成する
次に核となる Slice の定義です。 Slice は createSlice 関数で作成します。
createSlice には、Slice 名と初期値と Reducer の処理を渡します。 ここでのポイントは Redux Toolkit の Reducer ではステートの値を可変値 (Mutable)として扱うことができます。
Redux では Object のステートを扱う場合等はスプレッド構文を用いて常に新しい Object を返すようにする処理が必要でした。 対して Redux Toolkit はそのような処理が不要になりシンプルに値を扱えるようになります。
Reducer の記述の仕方は他にもありますがここでは割愛します。詳しく知りたい方は 公式ドキュメント をご覧ください。
export const counterSlice = createSlice({
  name: "counter",
  initialState,
  reducers: {
    increment: (state) => {
      // Redux Toolkit allows us to write "mutating" logic in reducers. It
      // doesn't actually mutate the state because it uses the Immer library,
      // which detects changes to a "draft state" and produces a brand new
      // immutable state based off those changes
      state.value += 1;
    },
    decrement: (state) => {
      state.value -= 1;
    },
    // Use the PayloadAction type to declare the contents of `action.payload`
    incrementByAmount: (state, action: PayloadAction<number>) => {
      state.value += action.payload;
    },
  },
});
Action は Slice から自動生成される
また、 Slice を作成することで自動的に Action も作成されます。 Redux では規模が大きくなるにつれてこの Action の管理が煩雑になっていくことが多いため、この辺りが簡潔な形で提供されているのはとても助かります。
以下の 1 文は Slice の外から Action を呼べるように export しています。
export const { increment, decrement, incrementByAmount } = counterSlice.actions;
非同期 Action の作成方法
非同期の Action を作成したい場合は Slice とは別で関数を記述します。 非同期用の Action は redux-thunk をベースに記述します。
関数を返す関数の形になっており、外側の関数では Action に必要な引数を受け取り、内側の関数では dispatch 関数を受け取り関数内で Action を発火します。
Redux では非同期処理に redux-saga を用いることがありますが、学習コストの高さから処理が逆に分かりづらくなってしまうことも多いです。個人的には中規模くらいのアプリまでは redux-thunk を使うと処理を追いやすいため、理解しやすいのではないかなと感じています。
// The function below is called a thunk and allows us to perform async logic. It
// can be dispatched like a regular action: `dispatch(incrementAsync(10))`. This
// will call the thunk with the `dispatch` function as the first argument. Async
// code can then be executed and other actions can be dispatched
export const incrementAsync = (amount: number): AppThunk => (dispatch) => {
  setTimeout(() => {
    dispatch(incrementByAmount(amount));
  }, 1000);
};
非同期の Action を作る場合には上記の方法とは別に createAsyncThunk 関数を用いる方法もあります。
createAsyncThunk 関数を使うと 1. 処理中 (pending) 、2. 処理成功時 (fulfilled) 、3. 処理失敗時 (rejected) の 3 つのタイミングで呼ばれる Reducer をそれぞれ定義できるなどより柔軟な設定ができるようになっています。
Selector を作成する
以下のコードは画面から State を使用する際のヘルパー関数です。 reactRedux の useSelector 関数に渡す関数をここで定義しています。
// The function below is called a selector and allows us to select a value from
// the state. Selectors can also be defined inline where they're used instead of
// in the slice file. For example: `useSelector((state: RootState) => state.counter.value)`
export const selectCount = (state: RootState) => state.counter.value;
Reducer を export
最後に Slice から作成された Reducer を export しています。 export した Reducer は store 実装部で configureStore 関数を用いて 1 つにまとめられます。
export default counterSlice.reducer;
ここまで Slice の実装を見てきました。 従来の Redux を使用していた方は Redux と比較して Action 周りを中心に簡潔に書けるようになっていることがお分かり頂けたのではないでしょうか。